19 August, 2016

Monitoring a URL script

export PATH=$PATH:/usr/local/bin
rm /tmp/discourl_chk.out

curl -sSf http://oracle-1.google.com:8090/discoverer/viewer > /tmp/discourl_chk.out

if [ $? -ne 0 ]; then
            ERROR_SUBJECT="CRITICAL: DISCO URL NOT REACHABLE - http://oracle-1.google.com:8090/discoverer/viewer "
                /usr/bin/mailx -s "$ERROR_SUBJECT" remote_dba@gmail.com,dba@gmail.com < /tmp/discourl_chk.out
else
        echo "NO ERROR, URL is accessible! Relax"
fi

05 August, 2016

How to Start / Stop services in Oracle Applications R12 ( Application / Database Tier)

This post covers step by step instructions of How to Start/Stop services in Oracle Applications R12. These steps are from Online Oracle Apps DBA (11i /R12) traininghere (This is interactive online course over weekend with hands on exercises on installation, patching, cloning during weekdays)
Assumptions
Application Tier O.S. User : avisr12 (usually applmgr)
Database Tier O.S. User : ovisr12 (usually oracle)
R12 install base : /oracle/apps/r12/visr12
Database SID : visr12
Database Version : 11.1.0
Hostname : focusthreadr12
Operating System : Unix/Linux
Apps Schema Password : apps (apps is default password)
.
Start-Up/Shutdown order
If you are starting services then first start Database Tier services and then ApplicationTier Services.
If you are shutting down services then first stop Application Tier services andthen Database Tier Services.
  
1. Startup
1.1 Start Database Tier
1.1.1 
Login as database tier user (ovisr12)
1.1.2 Set environment variable by running $SID_hostname.envfrom $INSTALL_BASE/db/tech_st/11.1.0
—- cd /oracle/apps/r12/visr12/db/tech_st/11.1.0
—- . visr12_focusthreadr12.com (note: dot in front)
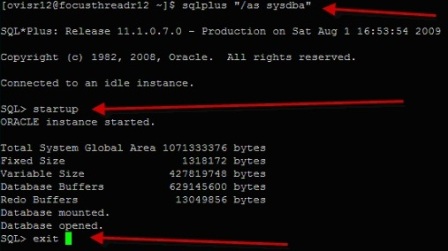
1.1.3 Start database
—- sqlplus “/as sysdba”
—- SQL> startup
1.1.4 
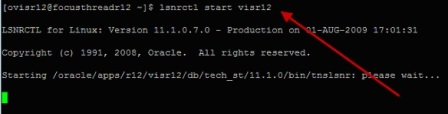
Start Database Listener (lsnrctl start $SID)
—- lsnrctl start visr12
.
.
1.2 Start Application Tier
1.2.1 
Login as application tier user (avisr12)
1.2.2 Set environment variable by running $SID_hostname.envfrom $INSTALL_BASE/apps/apps_st/appl
—- cd /oracle/apps/r12/visr12/apps/apps_st/appl
—- . visr12_focusthreadr12.com (note: dot in front)
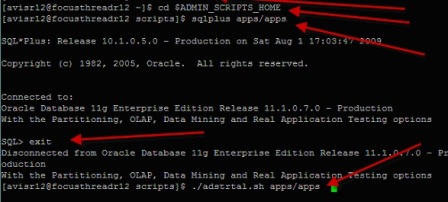
1.2.3 Start Application Tier (adstrtal.sh apps/$apps_password)
—- cd $ADMIN_SCRIPTS_HOME
—- ./adstrtal.sh apps/apps
.
.
2. Shutdown Services
2.1 Shutdown Application Tier
2.1.1 
Login as application tier user (avisr12)
2.1.2 Set environment variable by running $SID_hostname.env from $INSTALL_BASE/apps/apps_st/appl
—- cd /oracle/apps/r12/visr12/apps/apps_st/appl
—- . visr12_focusthreadr12.com (note: dot in front)
2.1.3 Stop Application Tier (adstpall.sh apps/$apps_password)
—- cd $ADMIN_SCRIPTS_HOME
—- ./adstpall.sh apps/apps
.
2.2 Shutdown Database Tier
2.2.1 
Login as database tier user (ovisr12)
2.2.2 Set environment variable by running $SID_hostname.env from $INSTALL_BASE/db/tech_st/11.1.0
—- cd /oracle/apps/r12/visr12/db/tech_st/11.1.0
—- . visr12_focusthreadr12.com (note: dot in front)
2.2.3 Stop database
—- sqlplus “/as sysdba”—- SQL> shutdown immediate
2.2.4 
Stop Database Listener (lsnrctl start $SID)
—- lsnrctl stop visr12

16 July, 2016

Compare the RPM packages installed on two different servers

Setting up new servers can be a pain if you’re not able to clone them from a server that is known to be working. Many VPS providers, like Slicehost, allow you to clone a system to a new system. Without that option, you can pull a list of RPM’s without their version number for a fairly quick and basic comparison.
First, pull a list of RPM package by name only:
Once you’ve done that on both servers, just use diff to compare the two files:

04 July, 2016

Upgrade to Oracle Database 12c – Single Instance

With every release of the Oracle database there is always an upgrade path that should be followed. For many, they rush out and download the software and attempt an install/upgrade; often before knowing what needs to be done. This can lead to disasters and potentially affect the business if not done successfully.
The upgrade path for going to Oracle Database 12c (12.1.0.1) is pretty straightforward. If you are running an Oracle Database that is a supported direct path upgrade to Oracle Database 12c you will have no problems using any of the supported upgrade methods. If you are not on a version that supports direct path upgrade, you will need to upgrade to a supported version before upgrading to Oracle Database 12c.
Supported Direct Upgrade Paths:
  • Oracle Database 10g (10.2.0.5)
  • Oracle Database 11g (11.1.0.7)
  • Oracle Database 11g (11.2.0.2 or later)
There are three supported upgrade paths/tools. All the upgrade options have their own issues that may be ran into. The upgrade options that are supported with Oracle Database 12c are:
  • Database Upgrade Assistant (DBUA)
  • Manual Upgrade (script based)
  • Export/Import
For the purpose of this article, let’s focus on using the Database Upgrade Assistant (DBUA).
Oracle has improved the DBUA to provide a seamless upgrade. If errors arise we now have options to fix them directly from DBUA. Additionally, the DBUA makes monitoring the upgrade easier. To use the DBUA we have to go to the Oracle Database 12c home and start it by running dbua. From working with Oracle Database 12c through beta testing and now general release, it is a best practice to run the preupgrd.sql to see what we may need to fix before running DBUA.

Run the PREUPGRD.SQL

In order to run the preupgrd.sql file, we first need to install the new binaries into an Oracle home for 12c. Once the binaries are in place, we need to setup our environment to connect to the database we want to upgrade.
In my test environment, my Oracle Database 11g settings are:
ORACLE_SID=ora11g
ORACLE_BASE=/opt/oracle
ORACLE_HOME=/opt/oracle/product/11.2.0.3.0/db_1
Next we need to go to the directory where the preupgrd.sql file is located:
#> cd /opt/oracle/product/12.1.0.1/dbhome_1/rdbms/admin
Finally, we need to connect to the 11g database with SQL*Plus and run the preupgrd.sql file:
#> sqlplus / as sysdba
SQL>@preupgrd.sql
When the preupgrd.sql script is done, we will be given the locations of the files that we need to reference for verifying and correcting any issues with our environment.
Results of the checks are located at:
/opt/oracle/cfgtoollogs/ora11g/preupgrade/preupgrade.log
Pre-Upgrade Fixup Script (run in source database environment):
/opt/oracle/cfgtoollogs/ora11g/preupgrade/preupgrade_fixups.sql
Post-Upgrade Fixup Script (run shortly after upgrade):
/opt/oracle/cfgtoollogs/ora11g/preupgrade/postupgrade_fixups.sql
Review these scripts and correct anything that needs to be fixes. Once these corrections are made, running the DBUA will be simpler. If there are any errors listed in the preupgrade.log, these need to be corrected before proceeding.

Running DBUA

Once everything has been corrected after reviewing the preupgrade.log, we can start the Database Upgrade Assistant (DBUA).
To start the DBUA, we need to go to the Oracle Database 12c home and run dbua:
#> cd /opt/oracle/product/12.1.0.1/dbhome_1/bin
#> ./dbua &
This will start the GUI to begin the upgrade. You will notice that I did not change anything in my environment. I’m still pointing to the 11g environment.
ORACLE_SID=ora11g
ORACLE_BASE=/opt/oracle
ORACLE_HOME=/opt/oracle/product/11.2.0.3.0/db_1
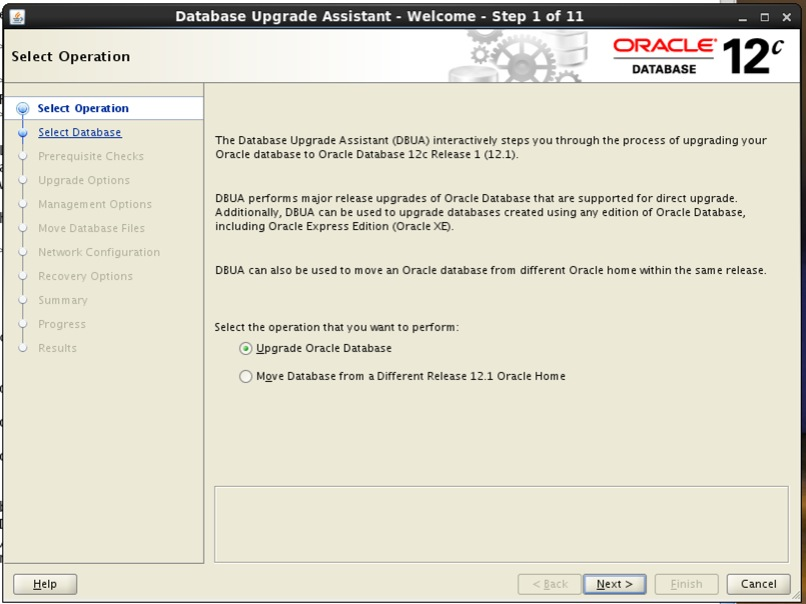
Once the DBUA starts, you will notice that we are at step 1 of 11.  The number of steps will change depending on the options that are selected. Step 1, we have two options:
  • Upgrade an Oracle Database
  • Move an existing 12c database to a new 12c oracle home
For the purpose of the update, we can just click next and move on.
Screenshot: Oracle 12c database upgrade assistant select operation
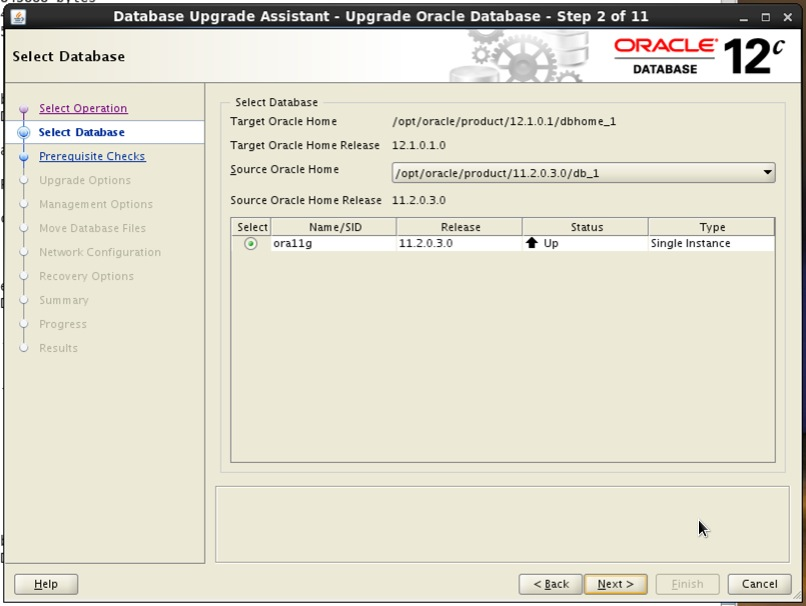
Part of the upgrade process we need to identify which Oracle home we want to upgrade. Since we started the DBUA with the Oracle home set to the 11g home, the DBUA will give us all databases associated with that Oracle home.  Select the database to be upgraded, then click next.
Screenshot: Oracle 12c database upgrade assistant select database
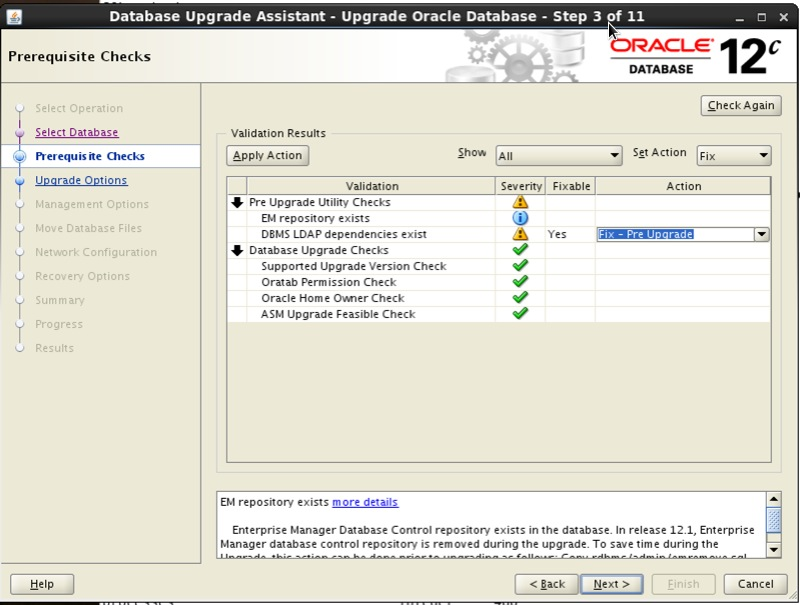
In step 3 we see results that look similar to what we looked at in the preupgrade.log. As you can tell, the DBUA is actually running the same preupgrd.sql script and returning the results back to the GUI. Additionally, Oracle has made the DBUA more intelligent by allowing us to select whether we can fix, ignore or revalidate the issues found by the preupgrd.sql. Make the selections you want and continue.
Screenshot: Oracle 12c database upgrade assistant prerequisite checks
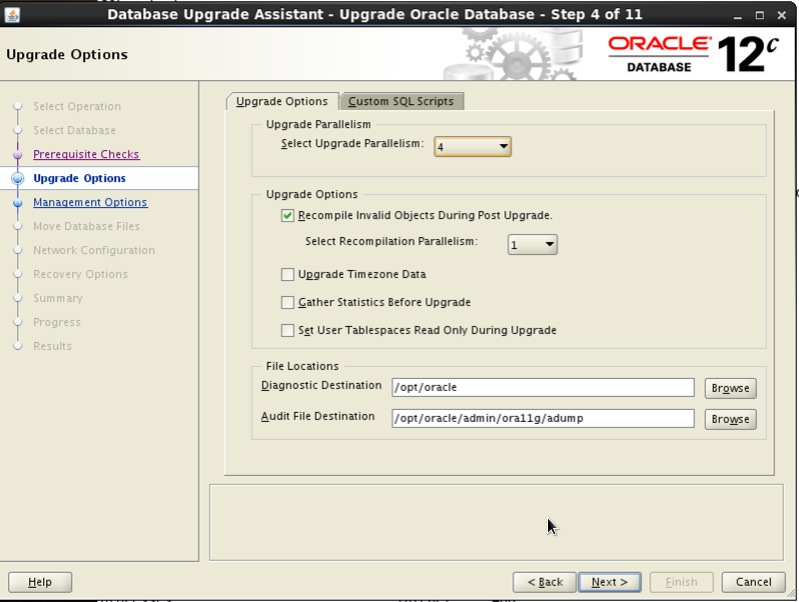
Step 4 is one of the most interesting screens in the DBUA. Oracle has made a fundamental change to how upgrades are handled. Upgrades can now be done in parallel! This is accomplished by using a new perl script,catctl.pl. The number of parallelism is calculated based on the number of CPUs in the server. Additionally, we can recompile object now in parallel and have DBUA perform the upgrade of time zones, gather statistics and make tablespaces read only during the upgrade. Click next to continue.
Screenshot: Oracle 12c database upgrade assistant upgrade options
Step 5 allows us to select how we want to manage our Oracle Database 12c environment. We can either select to use EM Express, the new web interface for Oracle Database 12c that replaces the database console in previous versions or we can register that database with Oracle Enterprise Manager 12c (OEM).
Note: If the OEM12c agents are already installed on the server where the upgrade is being done, the DBUA will pick up the need information automatically.
Screenshot: Oracle 12c database upgrade assistant management options
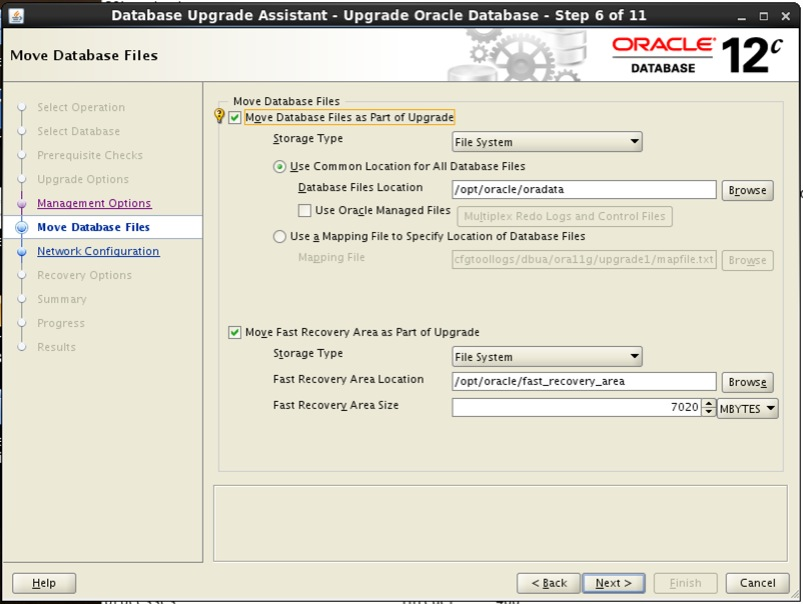
Step 6 allows us to specify where we want to move our data files and setup our Fast Recovery Area (FRA). We can also configure if we want to use Oracle Managed Files (OMF) at this point.
Screenshot: Oracle 12c database upgrade assistant move database files
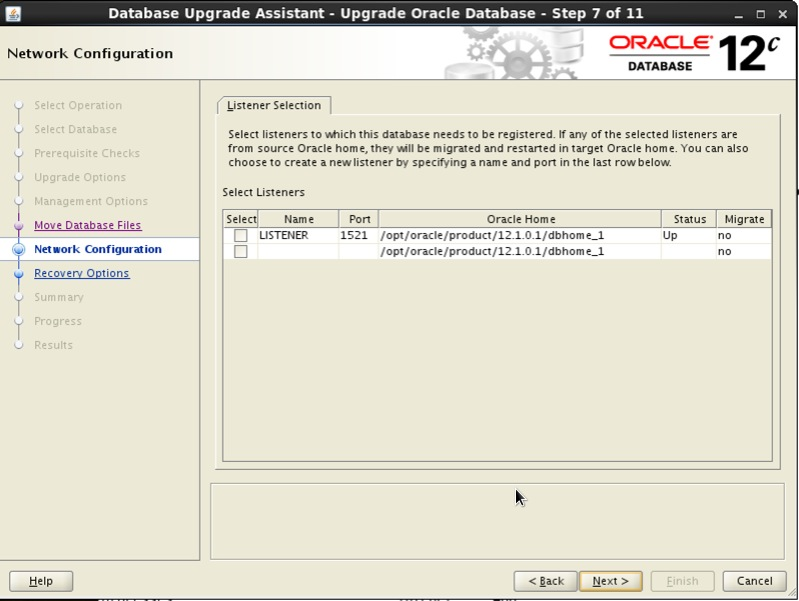
Step 7 gives us the option to migrate the listener for 11g over to 12c (if not already up). In the image below the 12c binaries are already installed and have a listener running from it. What’s important on this screen is the ‘Migrate’ column. This column will tell you whether or not the listener is going to be migrated.
Screenshot: Oracle 12c database upgrade assistant network configuration
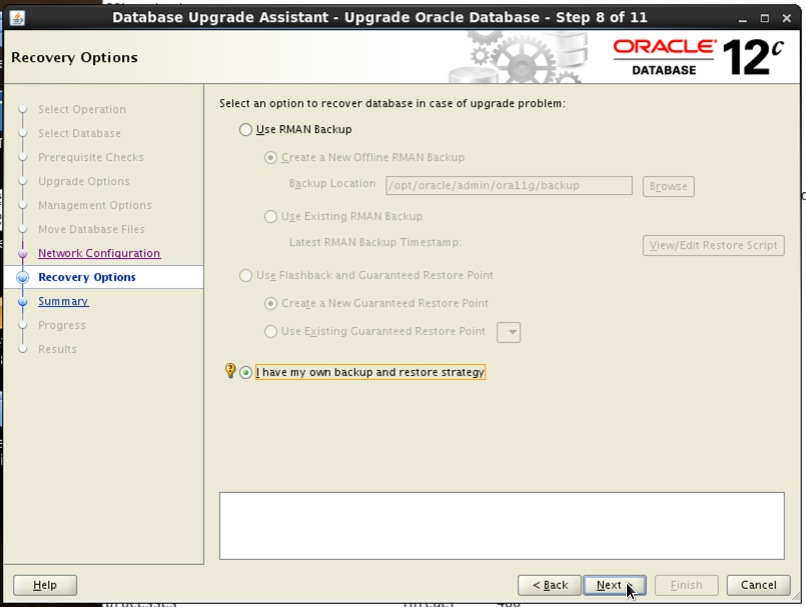
In step 8 we have the option to create a new backup of our database before upgrading. If we are confident in our backup strategies, we can tell the DBUA not to make a backup by selecting the radio button: ‘I have my own backup and restore strategy’.
Screenshot: Oracle 12c database upgrade assistant recovery options
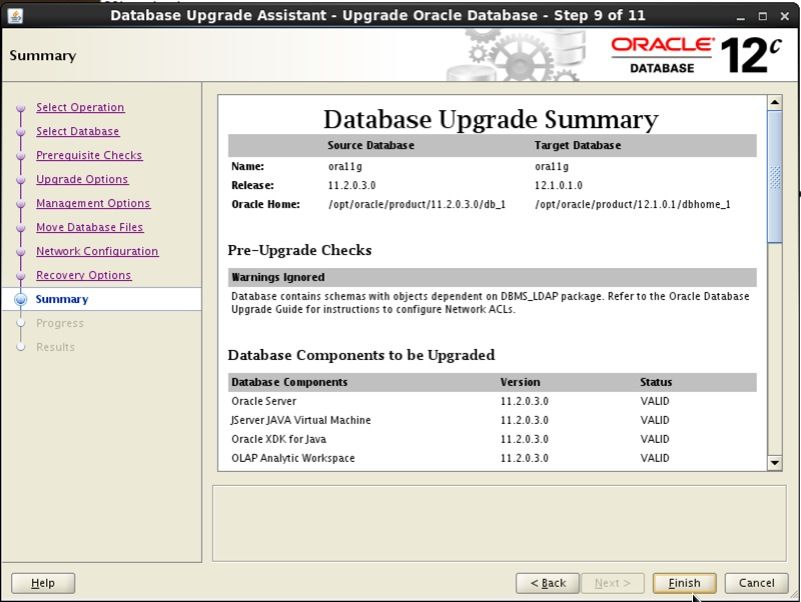
Finally, we reach the summary screen (Step 9). This screen will show us what the DBUA thinks it will be doing. One should always review this screen and make sure everything appears to be in order before clicking ‘Finish’.  Once we click finish, the upgrade will begin and we can monitor it via the progress screen.
Screenshot: Oracle 12c database upgrade assistant summary
On the progress screen, we can watch the progress of the upgrade. The arrows on this screen can be expanded to show the step that the DBUA is currently on. Another nice feature on the progress screen is the ability to see how long something takes to complete; this is found in the time column.
Screenshot: Oracle 12c database upgrade assistant progress
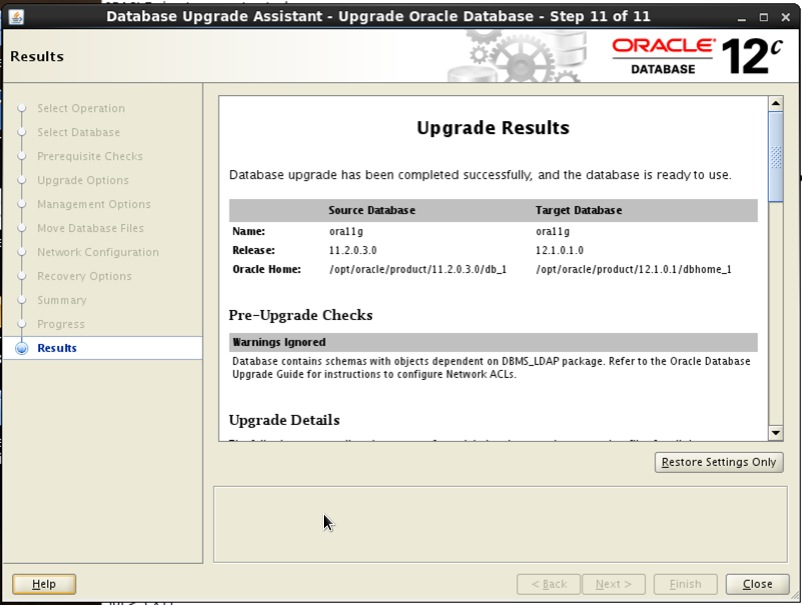
Once the upgrade is complete, the ‘Stop’ button will change it’s wording and say ‘Upgrade Results’. When you click this button, the interface will change and provide you with the results of the upgrade.
Screenshot: Oracle 12c database upgrade assistant results
At this point, the upgrade is done and the DBUA can be closed. Click the ‘Close’ button to exit the GUI.

Verify the Upgrade

There are multiple ways that the upgrade can be verified. The easiest way is the check the /etc/oratab file. Once the upgrade is done, this oratab file should have changed the Oracle home to match the 12c binary location.
Another way to verify is to check the environment variables from the command line:
#> env | grep ORA

ORACLE_SID=ora11g
ORACLE_BASE=/opt/oracle
ORACLE_HOME=/opt/oracle/product/12.1.0.1/dbhome_1
Lastly, we can use SQL*Plus to check the version of the database:
#> sqlplus / as sysdba
SQL> select banner from v$version
I hope this article has shown you how easy it is to upgrade an Oracle Database 11g up to the latest release of the Oracle Database 12c.

27 June, 2016

Multitenant : Create and Configure a Pluggable Database (PDB) in Oracle Database 12c Release 1 (12.1)

The multitenant option introduced in Oracle Database 12c allows a single container database (CDB) to host multiple separate pluggable databases (PDB).

Oracle Universal Installer (OUI)

In a previous article we discussed the creation of a pluggable database (PDB) during the creation of the container database (CDB) during the installation of the Oracle software using the Oracle Universal Installer (OUI). This topic will not be repeated here, so please refer to the Container Database article for more information.

Database Configuration Assistant (DBCA)


In a previous article we discussed the creation of a pluggable database (PDB) during the creation of the container database (CDB) using the Database Configuration Assistant (DBCA). This topic will not be repeated here, so please refer to the Container Database article for more information.
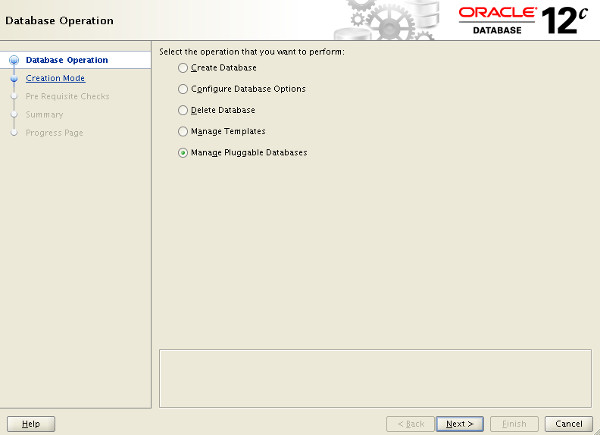
The DBCA includes a new option on the opening "Database Operation" screen that allows you to manage the pluggable databases of an existing container database. Select the "Manage Pluggable Databases" option and click the "Next" button.

The following sections describe some of these options.
PDB DBCA - Database Operation

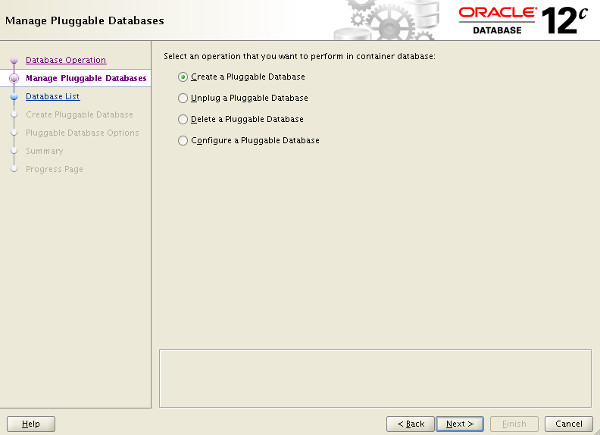
You can see from the resulting screen what operations are possible with pluggable databases.
PDB DBCA - Manage Pluggable Databases

The following sections describe some of these options.

Create a Pluggable Database (PDB) using the DBCA

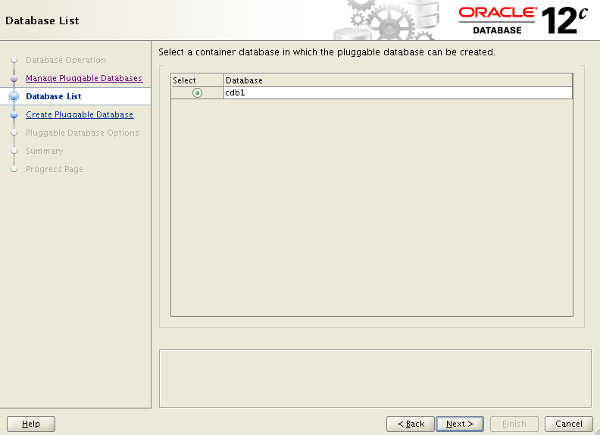
On the "Manage Pluggable Databases" screen shown previously, select the "Create a Pluggable Database" option and click the "Next" button. On the resulting screen, select the container database to house the new pluggable database and click the "Next" button.
PDB DBCA - Database List

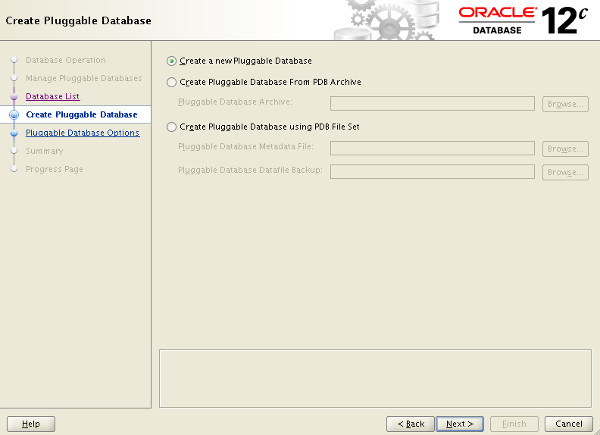
Select the "Create a new Pluggable Database" option and click the "Next" button. If you were plugging in a previously unplugged database, you would select the PDB Archive or PDB File Set options to match the format of the files containing the unplugged PDB.
PDB DBCA - Create Pluggable Database

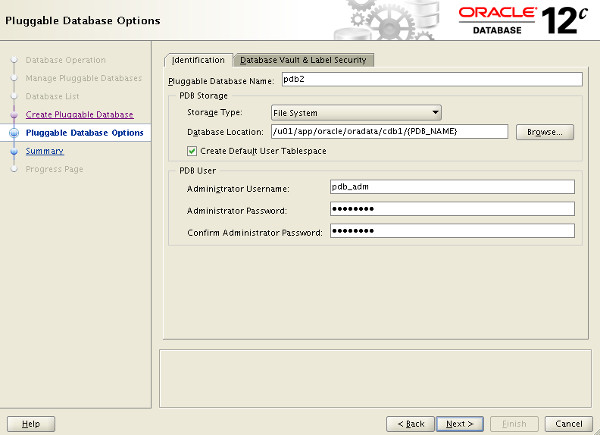
Enter the pluggable database name, database location and admin credentials, then click the "Next" button.
PDB DBCA - Pluggable Database Options

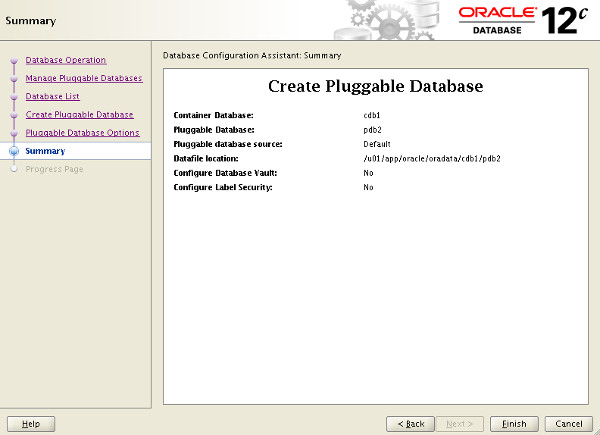
If you are happy with the summary information, click the "Finish" button.
PDB DBCA - Summary

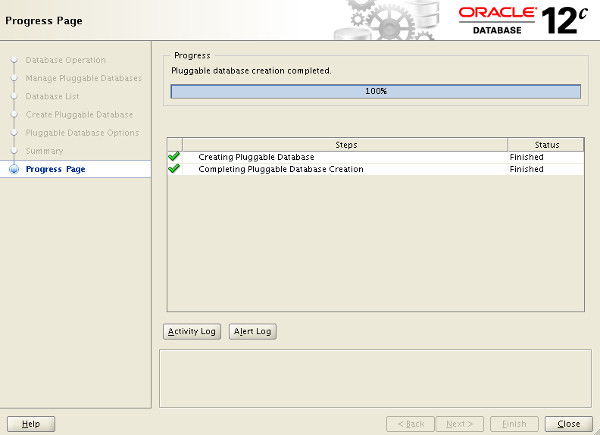
Wait while the pluggable database is created. Once complete, click the "OK" button on the message dialog and the "Close" button on the main screen.
PDB DBCA - Summary

The new pluggable database has been created as a clone of the seed database.

Unplug a Pluggable Database (PDB) using the DBCA

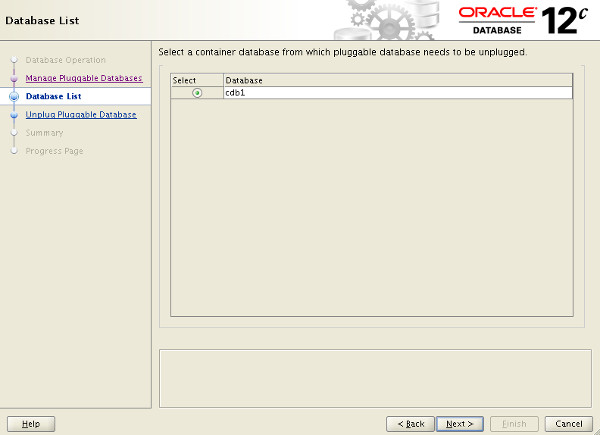
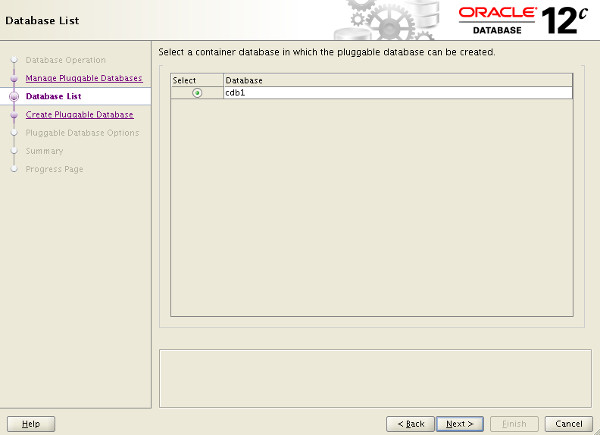
On the "Manage Pluggable Databases" screen shown previously, select the "Unplug a Pluggable Database" option and click the "Next" button. On the resulting screen, select the container database that houses the pluggable database to be unplugged and click the "Next" button.
PDB DBCA - Database List

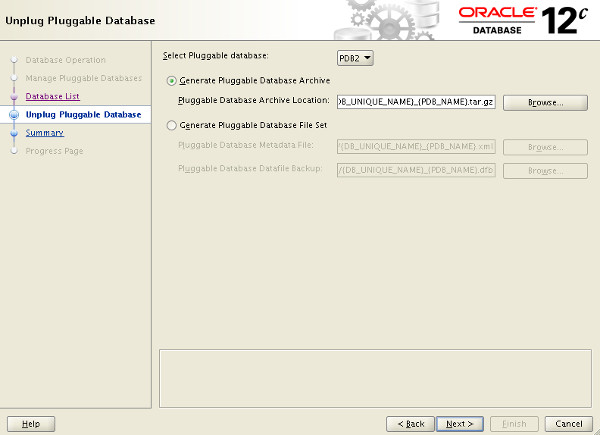
Select the PDB to unplug, decide whether to use a pluggable database archive or a file set and enter the appropriate location details. Click the "Next" button.
PDB DBCA - Unplug Pluggable Database

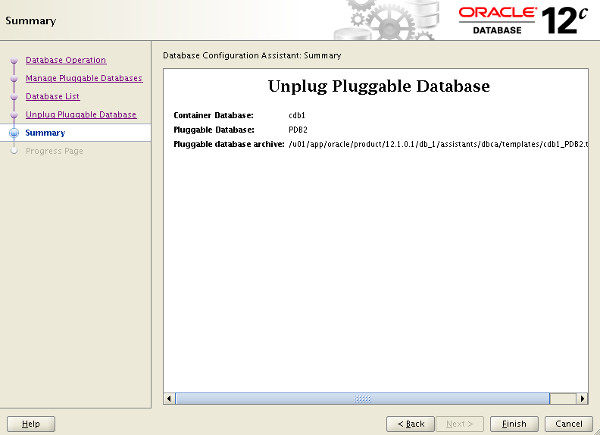
If you are happy with the summary information, click the "Finish" button.

PDB DBCA - Summary

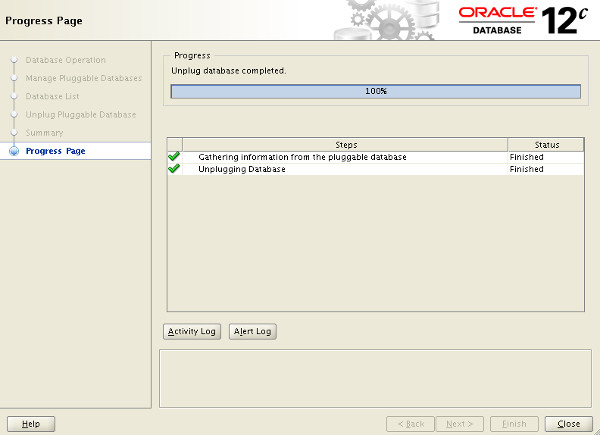
Wait while the pluggable database is unplugged. Once complete, click the "OK" button on the message dialog and the "Close" button on the main screen.

PDB DBCA - Summary

The pluggable database has now been unplugged.

Plugin a Pluggable Database (PDB) using the DBCA


On the "Manage Pluggable Databases" screen shown previously, select the "Create a Pluggable Database" option and click the "Next" button. On the resulting screen, select the container database to house the new pluggable database and click the "Next" button.
PDB DBCA - Database List

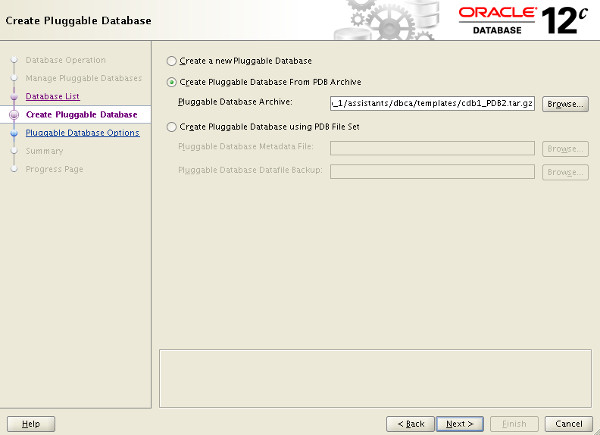
Select the "Create Pluggable Database From PDB Archive" or "Create Pluggable Database using PDB File Set" option and enter the location of the required files. You can browse for the files using the "Browse" button.

PDB DBCA - Create Pluggable Database

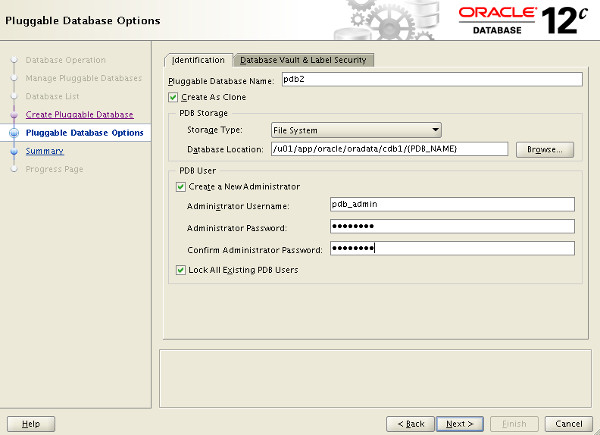
Enter the pluggable database name, database location and admin credentials, then click the "Next" button.

PDB DBCA - Pluggable Database Options

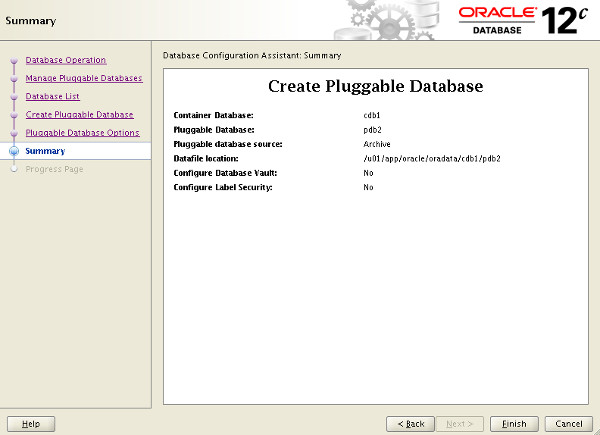
If you are happy with the summary information, click the "Finish" button.

PDB DBCA - Summary

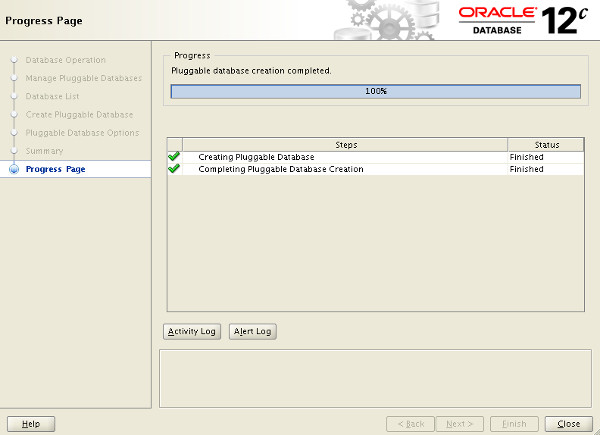
Wait while the pluggable database is created. Once complete, click the "OK" button on the message dialog and the "Close" button on the main screen.

PDB DBCA - Summary

The pluggable database has been plugged into the container database.

Delete a Pluggable Database (PDB) using the DBCA


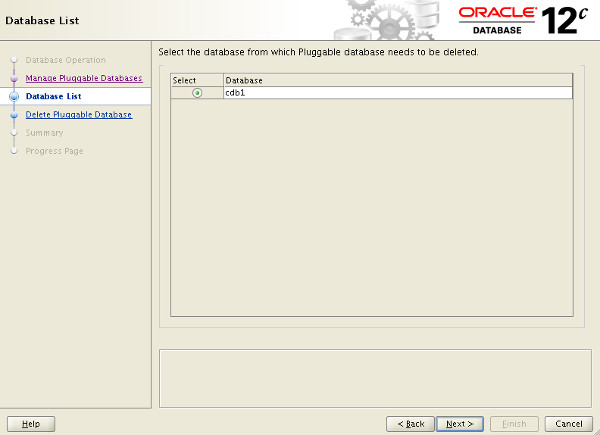
On the "Manage Pluggable Databases" screen shown previously, select the "Delete a Pluggable Database" option and click the "Next" button. On the resulting screen, select the container database that houses the pluggable database to be deleted and click the "Next" button.
PDB DBCA - Database List

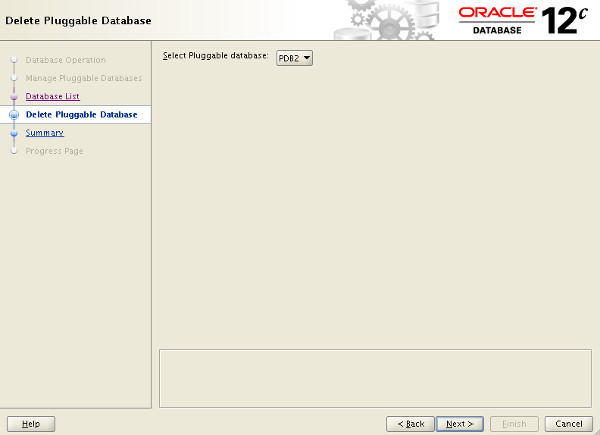
Select the PDB to delete and click the "Next" button.

PDB DBCA - Delete Pluggable Database

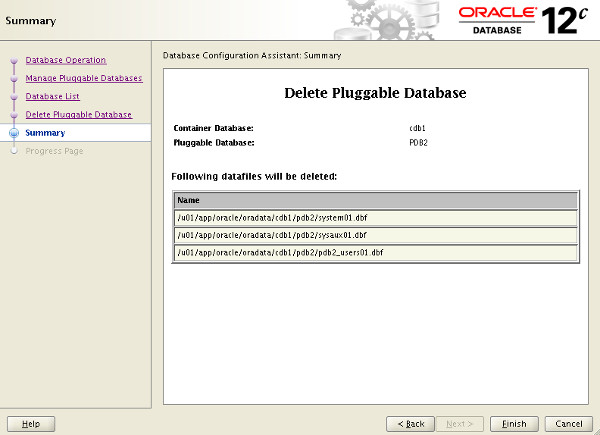
If you are happy with the summary information, click the "Finish" button.

PDB DBCA - Summary

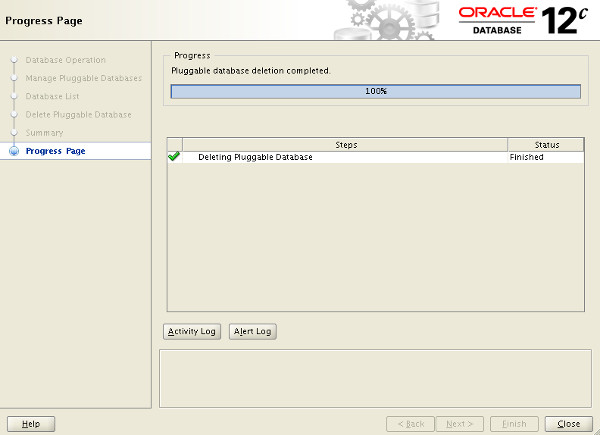
Wait while the pluggable database is deleted. Once complete, click the "OK" button on the message dialog and the "Close" button on the main screen.

PDB DBCA - Summary

The pluggable database has been deleted from the container database.

Configure a Pluggable Database (PDB) using the DBCA

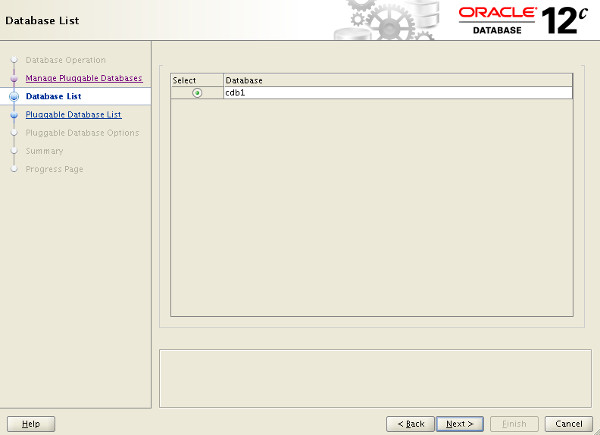
On the "Manage Pluggable Databases" screen shown previously, select the "Configure a Pluggable Database" option and click the "Next" button. On the resulting screen, select the container database that houses the pluggable database to be configured and click the "Next" button.
PDB DBCA - Database List
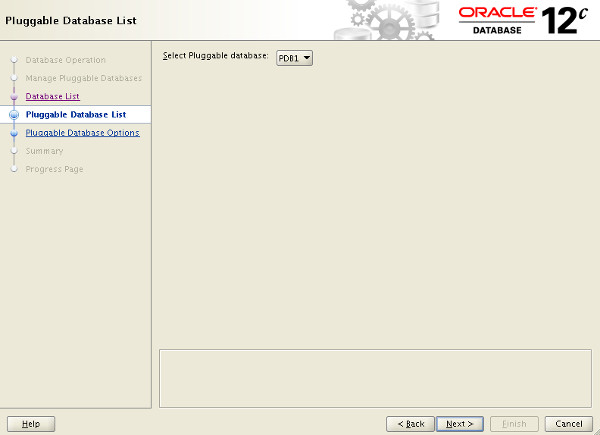
Select the PDB to configure and click the "Next" button.
PDB DBCA - Pluggable Database List

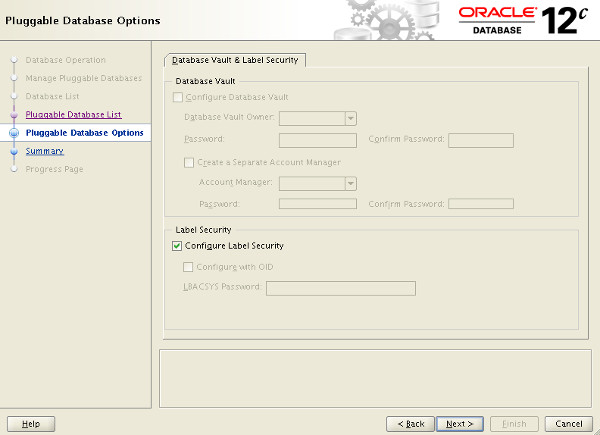
Select any additional options you would like to configure, then click the "Next" button.
PDB DBCA - Pluggable Database Options

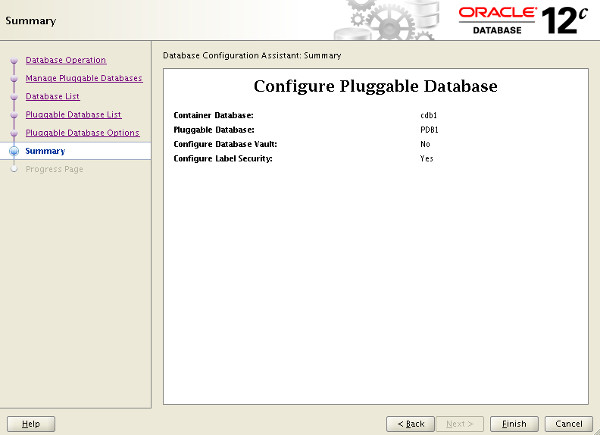
If you are happy with the summary information, click the "Finish" button.
PDB DBCA - Summary

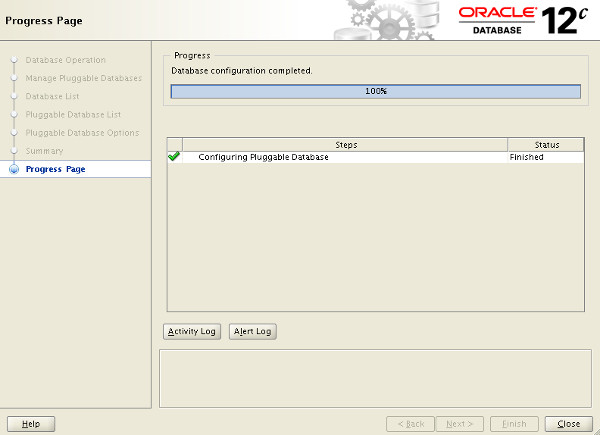
Wait while the pluggable database is configured. Once complete, click the "OK" button on the message dialog and the "Close" button on the main screen.
PDB DBCA - Progress

The pluggable database has been configured.


Manual (SQL*Plus)

There are lots of variations on the CREATE PLUGGABLE DATABASE and ALTER PLUGGABLE DATABASE commands, so we will keep things simple here and only focus on those that mimic what is possible in the DBCA.
For all the operations listed here you must be connected to the CDB with the container set to root (the default). Typically you will be connected to a common user with SYSDBA or SYSOPER privilege. When creating a new pluggable database, the user must have the CREATE PLUGGABLE DATABASE system privilege.

Create a Pluggable Database (PDB) Manually

To create a new pluggable database from the seed database, all we have to do is tell Oracle where the file should be placed. We can do this using one of two methods. The first method uses the FILE_NAME_CONVERT clause in the CREATE PLUGGABLE DATABASE statement.
CONN / AS SYSDBA

CREATE PLUGGABLE DATABASE pdb2 ADMIN USER pdb_adm IDENTIFIED BY Password1
  FILE_NAME_CONVERT=('/u01/app/oracle/oradata/cdb1/pdbseed/','/u01/app/oracle/oradata/cdb1/pdb2/');
Alternatively, we can specify the PDB_FILE_NAME_CONVERT initialization parameter before calling the command without using the FILE_NAME_CONVERT clause.
CONN / AS SYSDBA

ALTER SESSION SET PDB_FILE_NAME_CONVERT='/u01/app/oracle/oradata/cdb1/pdbseed/','/u01/app/oracle/oradata/cdb1/pdb3/';

CREATE PLUGGABLE DATABASE pdb3 ADMIN USER pdb_adm IDENTIFIED BY Password1;
Every time there is a need to convert file locations, either of these two methods will work. For the remainder of the article I will stick to using the FILE_NAME_CONVERT method to cut down on the variations I have to display.
We can see the PDBs are present by querying the DBA_PDBS and V$PDBS views.
COLUMN pdb_name FORMAT A20

SELECT pdb_name, status
FROM   dba_pdbs
ORDER BY pdb_name;

PDB_NAME      STATUS
-------------------- -------------
PDB$SEED      NORMAL
PDB1       NORMAL
PDB2       NEW
PDB3       NEW

SQL>

SELECT name, open_mode
FROM   v$pdbs
ORDER BY name;

NAME          OPEN_MODE
------------------------------ ----------
PDB$SEED         READ ONLY
PDB1          MOUNTED
PDB2          MOUNTED
PDB3          MOUNTED

SQL>
The PDBs are created with the status of 'NEW'. They must be opened in READ WRITE mode at least once for the integration of the PDB into the CDB to be complete.
ALTER PLUGGABLE DATABASE pdb2 OPEN READ WRITE;
ALTER PLUGGABLE DATABASE pdb3 OPEN READ WRITE;

SELECT pdb_name, status
FROM   dba_pdbs
ORDER BY pdb_name;

PDB_NAME      STATUS
-------------------- -------------
PDB$SEED      NORMAL
PDB1       NORMAL
PDB2       NORMAL
PDB3       NORMAL

SQL>

SELECT name, open_mode
FROM   v$pdbs
ORDER BY name;

NAME          OPEN_MODE
------------------------------ ----------
PDB$SEED         READ ONLY
PDB1          MOUNTED
PDB2          READ WRITE
PDB3          READ WRITE

SQL>
 Depending on the syntax used, you may need to grant the PDB_DBA role to the local admin users for the PDB.

Unplug a Pluggable Database (PDB) Manually

Before attempting to unplug a PDB, you must make sure it is closed. To unplug the database use the ALTER PLUGGABLE DATABASE command with the UNPLUG INTO clause to specify the location of the XML metadata file.
ALTER PLUGGABLE DATABASE pdb2 CLOSE;
ALTER PLUGGABLE DATABASE pdb2 UNPLUG INTO '/u01/app/oracle/oradata/cdb1/pdb2/pdb2.xml';
The pluggable database is still present, but you shouldn't open it until the metadata file and all the datafiles are copied somewhere safe.
SELECT name, open_mode
FROM   v$pdbs
ORDER BY name;

NAME          OPEN_MODE
------------------------------ ----------
PDB$SEED         READ ONLY
PDB1          MOUNTED
PDB2          MOUNTED
PDB3          READ WRITE

SQL>
You can delete the PDB, choosing to keep the files on the file system.
DROP PLUGGABLE DATABASE pdb2 KEEP DATAFILES;

SELECT name, open_mode
FROM   v$pdbs
ORDER BY name;

NAME          OPEN_MODE
------------------------------ ----------
PDB$SEED         READ ONLY
PDB1          MOUNTED
PDB3          READ WRITE

SQL>

Plugin a Pluggable Database (PDB) Manually

Plugging in a PDB into the CDB is similar to creating a new PDB. First check the PBD is compatible with the CDB by calling the DBMS_PDB.CHECK_PLUG_COMPATIBILITY function, passing in the XML metadata file and the name of the PDB you want to create using it.
SET SERVEROUTPUT ON
DECLARE
  l_result BOOLEAN;
BEGIN
  l_result := DBMS_PDB.check_plug_compatibility(
                pdb_descr_file => '/u01/app/oracle/oradata/cdb1/pdb2/pdb2.xml',
                pdb_name       => 'pdb2');

  IF l_result THEN
    DBMS_OUTPUT.PUT_LINE('compatible');
  ELSE
    DBMS_OUTPUT.PUT_LINE('incompatible');
  END IF;
END;
/
compatible

PL/SQL procedure successfully completed.

SQL>
If the PDB is not compatible, violations are listed in the PDB_PLUG_IN_VIOLATIONS view. If the PDB is compatible, create a new PDB using it as the source. If we were creating it with a new name we might do something like this.
CREATE PLUGGABLE DATABASE pdb5 USING '/u01/app/oracle/oradata/cdb1/pdb2/pdb2.xml'
  FILE_NAME_CONVERT=('/u01/app/oracle/oradata/cdb1/pdb2/','/u01/app/oracle/oradata/cdb1/pdb5/');
Instead, we want to plug the database back into the same container, so we don't need to copy the files or recreate the temp file, so we can do the following.
CREATE PLUGGABLE DATABASE pdb2 USING '/u01/app/oracle/oradata/cdb1/pdb2/pdb2.xml'
  NOCOPY
  TEMPFILE REUSE;

ALTER PLUGGABLE DATABASE pdb2 OPEN READ WRITE;

SELECT name, open_mode
FROM   v$pdbs
ORDER BY name;

NAME          OPEN_MODE
------------------------------ ----------
PDB$SEED         READ ONLY
PDB1          MOUNTED
PDB2          READ WRITE
PDB3          READ WRITE

SQL>

Clone a Pluggable Database (PDB) Manually

Cloning an existing local PDB is similar to creating a new PDB from the seed PDB, except now we are using non-seed PDB as the source, which we have to identify using the FROMclause. Make sure the source PDB is open in READ ONLY mode.
ALTER PLUGGABLE DATABASE pdb3 CLOSE;
ALTER PLUGGABLE DATABASE pdb3 OPEN READ ONLY;

CREATE PLUGGABLE DATABASE pdb4 FROM pdb3
  FILE_NAME_CONVERT=('/u01/app/oracle/oradata/cdb1/pdb3/','/u01/app/oracle/oradata/cdb1/pdb4/');

ALTER PLUGGABLE DATABASE pdb4 OPEN READ WRITE;

-- Switch the source PDB back to read/write
ALTER PLUGGABLE DATABASE pdb3 CLOSE;
ALTER PLUGGABLE DATABASE pdb3 OPEN READ WRITE;
The cloning syntax also allows for cloning from remote databases using a database link in the local CBD. There are a few restriction associated with this functionality.
  • The database link can point directly to the remote PDB or to a common user in the remote CBD that owns the remote PDB.
  • If it points to a common user in the remote CBD that owns the remote PDB, that user must have the CREATE PLUGGABLE DATABASE system privilege.
  • The source and target CDBs must have the same endians.
  • The source and target CDBs must have the same options installed.
  • The source and target CDBs must have the same character set and national character set.
Assuming the remote PDB was in READ ONLY mode, the following command should perform the required operation.
CREATE PLUGGABLE DATABASE pdb5 FROM remote_pdb5@remotecdb1
  FILE_NAME_CONVERT=('/u01/app/oracle/oradata/cdb1/remote_pdb5/','/u01/app/oracle/oradata/cdb1/pdb5/');

ALTER PLUGGABLE DATABASE pdb4 OPEN READ WRITE;
This functionality does not work properly in the 12.1.0.1 release of the database, but it has been fixed in 12.1.0.2. You can see an article specifically on this subject here.

Clone a Pluggable Database (PDB) Manually (Metadata Only : NO DATA)

The 12.1.0.2 patchset introduced the ability to do a metadata-only clone. Adding the NO DATA clause when cloning a PDB signifies that only the metadata for the user-created objects should be cloned, not the data in the tables and indexes. You can read more about this feature in the following article.

Delete a Pluggable Database (PDB) Manually

When dropping a pluggable database, you must decide whether to keep or drop the associated datafiles. The PDBs must be closed before being dropped.
ALTER PLUGGABLE DATABASE pdb2 CLOSE;
DROP PLUGGABLE DATABASE pdb2 KEEP DATAFILES;

ALTER PLUGGABLE DATABASE pdb3 CLOSE;
DROP PLUGGABLE DATABASE pdb3 INCLUDING DATAFILES;

ALTER PLUGGABLE DATABASE pdb4 CLOSE;
DROP PLUGGABLE DATABASE pdb4 INCLUDING DATAFILES;

SELECT name, open_mode
FROM   v$pdbs
ORDER BY name;

NAME          OPEN_MODE
------------------------------ ----------
PDB$SEED         READ ONLY
PDB1          MOUNTED

SQL>

SQL Developer

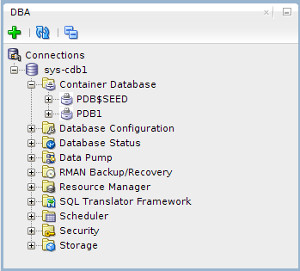
The DBA section of SQL Developer includes tree node called "Container Database".
PDB SQL Developer
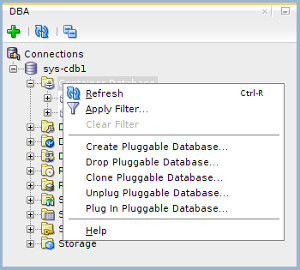
Right-clicking on the "Container Database" node produces a popup menu showing you what operations are available.
PDB SQL Developer Popup 1
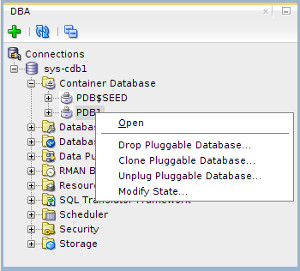
Right-clicking on a specific PDB node produces a popup menu showing only those operations that are relevant to that PDB.
PDB SQL Developer Popup 2
If you understand the DBCA and SQL*Plus approach to managing PDBs, these SQL Developer screens are very straight forward.

Cloud Control

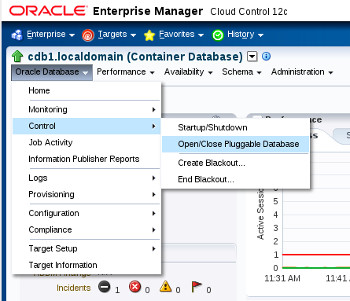
Cloud Control 12cR3 onward supports pluggable database functionality. Once you click on the container database, the "Oracle Database > Control > Open/Close Pluggable Database" menu option allows you to control the state of the PDBs owned by the CDB.
PDB Cloud Control - Control
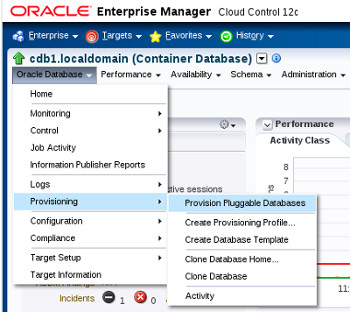
The "Oracle Database > Provision > Provision Pluggable Database" menu option allows you to perform other operations PDBs owned by the CDB, including cloning, unplugging amongst other things.
PDB Cloud Control - Provisioning
As with SQL Developer, if you understand how the pluggable database functionality works, the Cloud Control screens are self explanatory.


Finding OPP Manager log for a concurrent request

=> Use below query to find the OPP manager log for a concurrent request.  SELECT fcpp.concurrent_request_id req_id, fcp.node_name, fcp.lo...