With every release of the Oracle database there is always an upgrade path that should be followed. For many, they rush out and download the software and attempt an install/upgrade; often before knowing what needs to be done. This can lead to disasters and potentially affect the business if not done successfully.
The upgrade path for going to Oracle Database 12c (12.1.0.1) is pretty straightforward. If you are running an Oracle Database that is a supported direct path upgrade to Oracle Database 12c you will have no problems using any of the supported upgrade methods. If you are not on a version that supports direct path upgrade, you will need to upgrade to a supported version before upgrading to Oracle Database 12c.
Supported Direct Upgrade Paths:
- Oracle Database 10g (10.2.0.5)
- Oracle Database 11g (11.1.0.7)
- Oracle Database 11g (11.2.0.2 or later)
There are three supported upgrade paths/tools. All the upgrade options have their own issues that may be ran into. The upgrade options that are supported with Oracle Database 12c are:
- Database Upgrade Assistant (DBUA)
- Manual Upgrade (script based)
- Export/Import
For the purpose of this article, let’s focus on using the Database Upgrade Assistant (DBUA).
Oracle has improved the DBUA to provide a seamless upgrade. If errors arise we now have options to fix them directly from DBUA. Additionally, the DBUA makes monitoring the upgrade easier. To use the DBUA we have to go to the Oracle Database 12c home and start it by running dbua. From working with Oracle Database 12c through beta testing and now general release, it is a best practice to run the preupgrd.sql to see what we may need to fix before running DBUA.
Run the PREUPGRD.SQL
In order to run the preupgrd.sql file, we first need to install the new binaries into an Oracle home for 12c. Once the binaries are in place, we need to setup our environment to connect to the database we want to upgrade.
In my test environment, my Oracle Database 11g settings are:
Next we need to go to the directory where the preupgrd.sql file is located:
Finally, we need to connect to the 11g database with SQL*Plus and run the preupgrd.sql file:
When the preupgrd.sql script is done, we will be given the locations of the files that we need to reference for verifying and correcting any issues with our environment.
Results of the checks are located at:
Pre-Upgrade Fixup Script (run in source database environment):
Post-Upgrade Fixup Script (run shortly after upgrade):
Review these scripts and correct anything that needs to be fixes. Once these corrections are made, running the DBUA will be simpler. If there are any errors listed in the preupgrade.log, these need to be corrected before proceeding.
Running DBUA
Once everything has been corrected after reviewing the preupgrade.log, we can start the Database Upgrade Assistant (DBUA).
To start the DBUA, we need to go to the Oracle Database 12c home and run dbua:
This will start the GUI to begin the upgrade. You will notice that I did not change anything in my environment. I’m still pointing to the 11g environment.
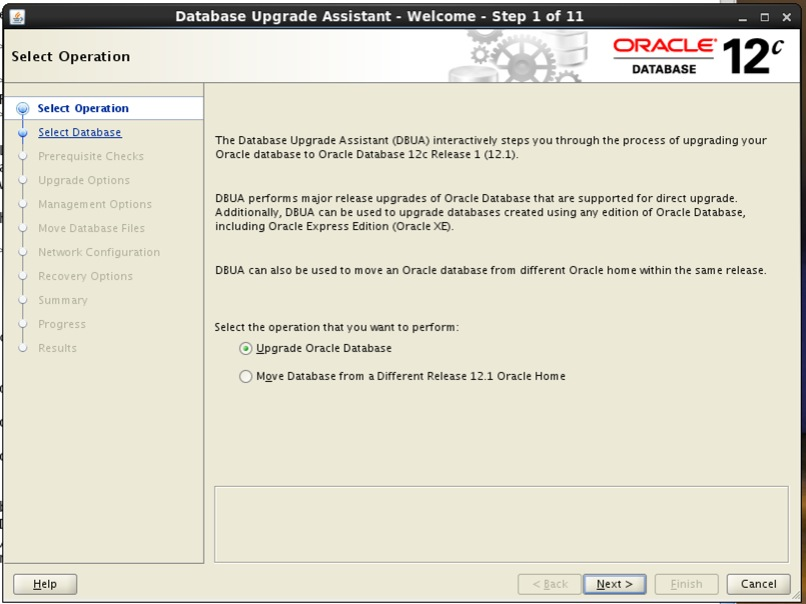
Once the DBUA starts, you will notice that we are at step 1 of 11. The number of steps will change depending on the options that are selected. Step 1, we have two options:
- Upgrade an Oracle Database
- Move an existing 12c database to a new 12c oracle home
For the purpose of the update, we can just click next and move on.
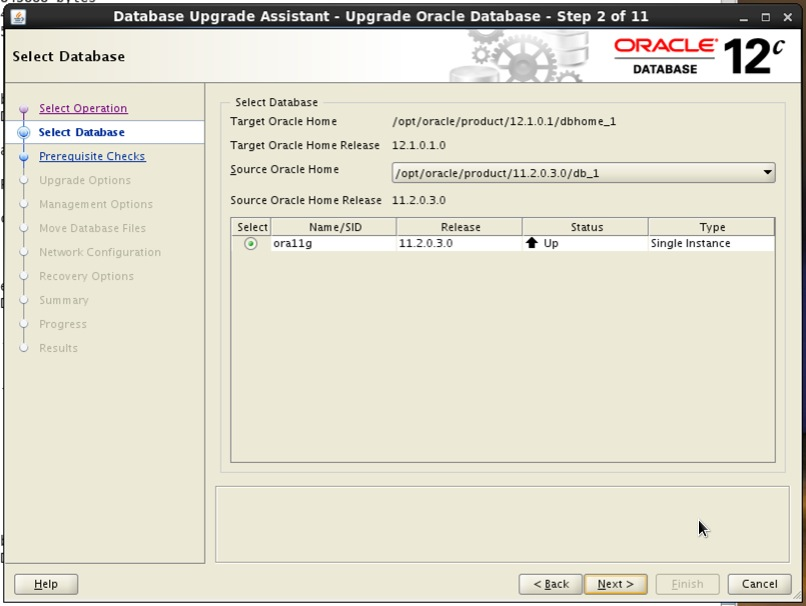
Part of the upgrade process we need to identify which Oracle home we want to upgrade. Since we started the DBUA with the Oracle home set to the 11g home, the DBUA will give us all databases associated with that Oracle home. Select the database to be upgraded, then click next.
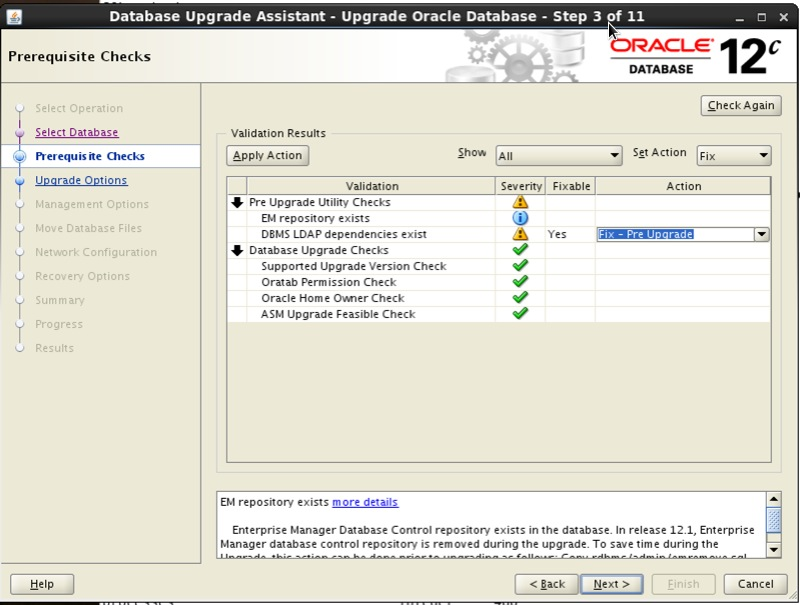
In step 3 we see results that look similar to what we looked at in the preupgrade.log. As you can tell, the DBUA is actually running the same preupgrd.sql script and returning the results back to the GUI. Additionally, Oracle has made the DBUA more intelligent by allowing us to select whether we can fix, ignore or revalidate the issues found by the preupgrd.sql. Make the selections you want and continue.
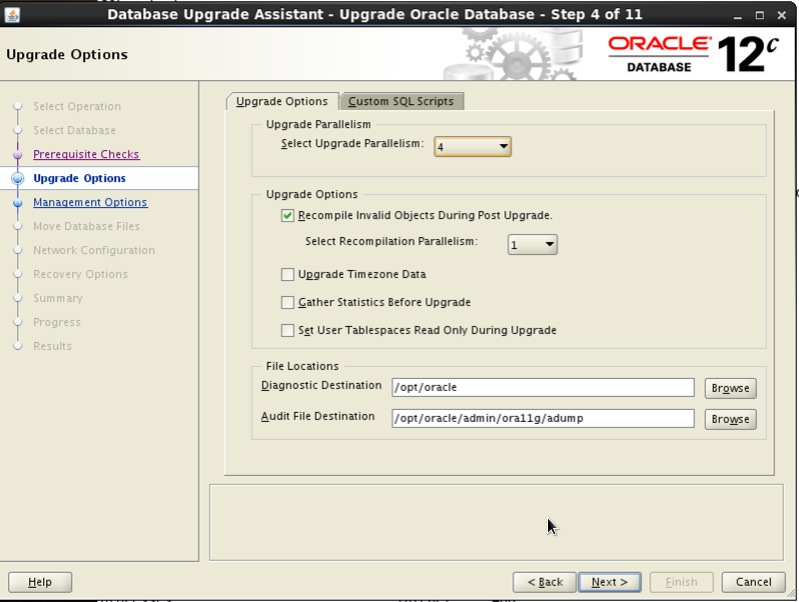
Step 4 is one of the most interesting screens in the DBUA. Oracle has made a fundamental change to how upgrades are handled. Upgrades can now be done in parallel! This is accomplished by using a new perl script,catctl.pl. The number of parallelism is calculated based on the number of CPUs in the server. Additionally, we can recompile object now in parallel and have DBUA perform the upgrade of time zones, gather statistics and make tablespaces read only during the upgrade. Click next to continue.
Step 5 allows us to select how we want to manage our Oracle Database 12c environment. We can either select to use EM Express, the new web interface for Oracle Database 12c that replaces the database console in previous versions or we can register that database with Oracle Enterprise Manager 12c (OEM).
Note: If the OEM12c agents are already installed on the server where the upgrade is being done, the DBUA will pick up the need information automatically.
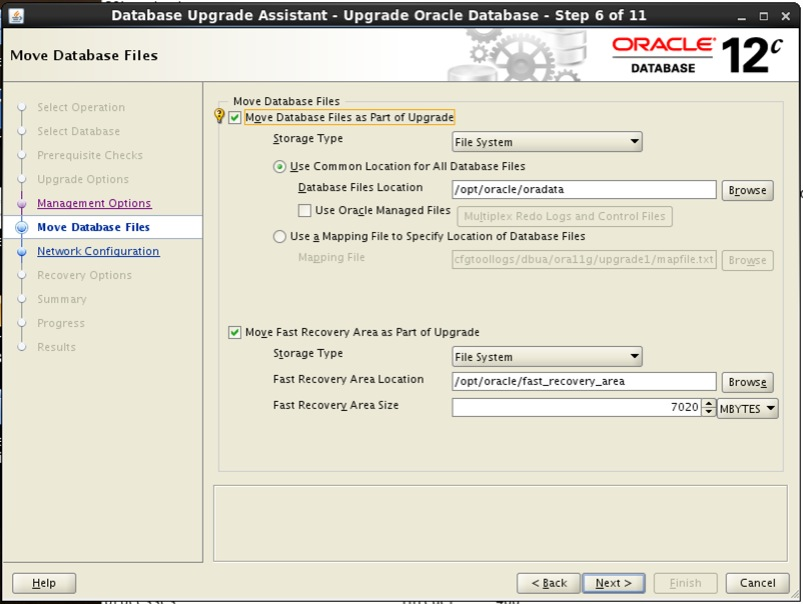
Step 6 allows us to specify where we want to move our data files and setup our Fast Recovery Area (FRA). We can also configure if we want to use Oracle Managed Files (OMF) at this point.
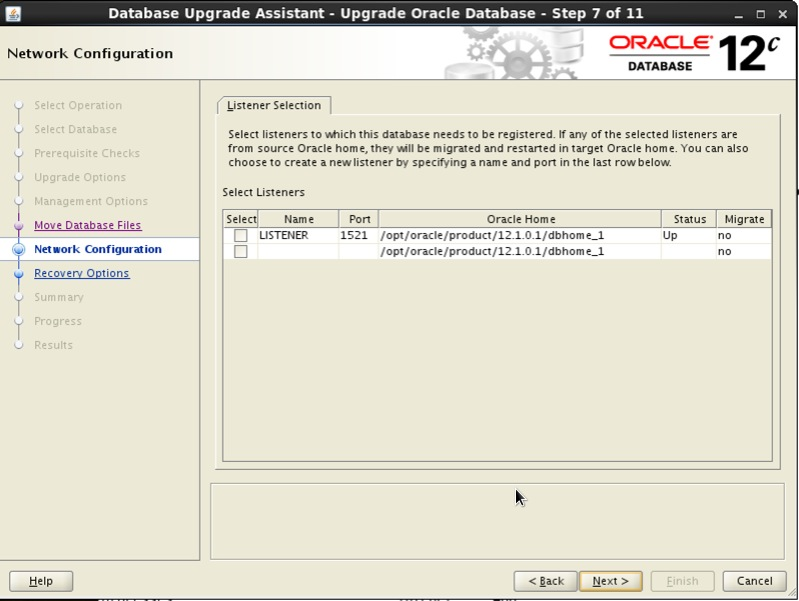
Step 7 gives us the option to migrate the listener for 11g over to 12c (if not already up). In the image below the 12c binaries are already installed and have a listener running from it. What’s important on this screen is the ‘Migrate’ column. This column will tell you whether or not the listener is going to be migrated.
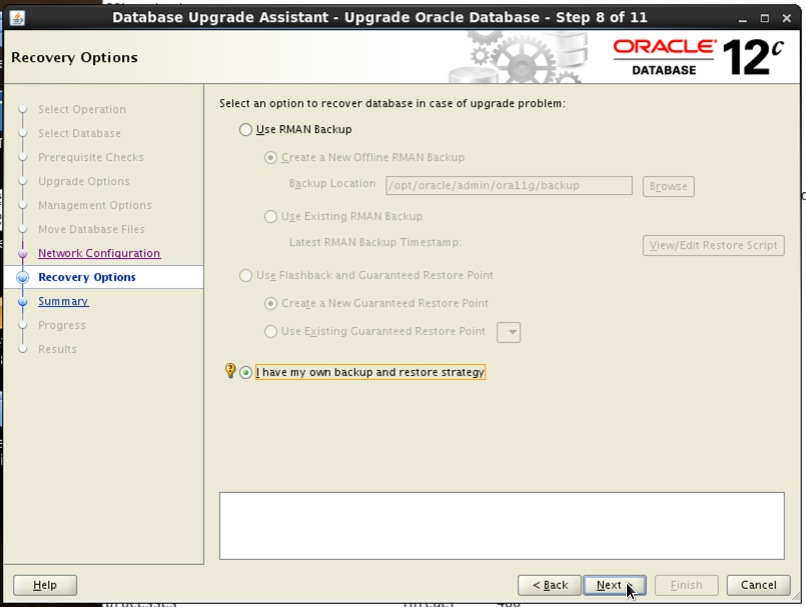
In step 8 we have the option to create a new backup of our database before upgrading. If we are confident in our backup strategies, we can tell the DBUA not to make a backup by selecting the radio button: ‘I have my own backup and restore strategy’.
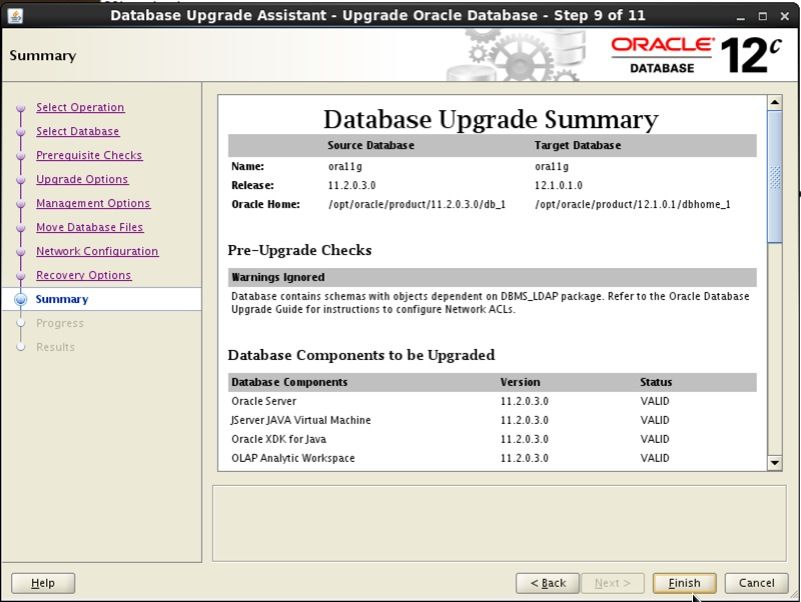
Finally, we reach the summary screen (Step 9). This screen will show us what the DBUA thinks it will be doing. One should always review this screen and make sure everything appears to be in order before clicking ‘Finish’. Once we click finish, the upgrade will begin and we can monitor it via the progress screen.
On the progress screen, we can watch the progress of the upgrade. The arrows on this screen can be expanded to show the step that the DBUA is currently on. Another nice feature on the progress screen is the ability to see how long something takes to complete; this is found in the time column.
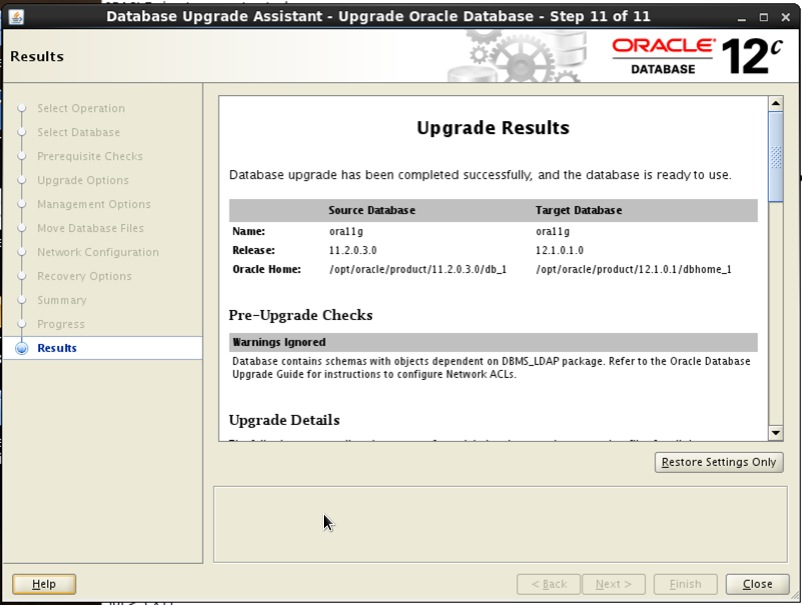
Once the upgrade is complete, the ‘Stop’ button will change it’s wording and say ‘Upgrade Results’. When you click this button, the interface will change and provide you with the results of the upgrade.
At this point, the upgrade is done and the DBUA can be closed. Click the ‘Close’ button to exit the GUI.
Verify the Upgrade
There are multiple ways that the upgrade can be verified. The easiest way is the check the /etc/oratab file. Once the upgrade is done, this oratab file should have changed the Oracle home to match the 12c binary location.
Another way to verify is to check the environment variables from the command line:
Lastly, we can use SQL*Plus to check the version of the database:
I hope this article has shown you how easy it is to upgrade an Oracle Database 11g up to the latest release of the Oracle Database 12c.


No comments:
Post a Comment